In the Art Room with Mrs. Andrews
  • Projects
    • Kindergarten >
      • Primary Birds
      • Roots
      • Story of Our 5 Senses
      • Jungle/Rainforest
      • Insects
    • 1st Grade >
      • Fish with Patterns
      • Windy Day at the Beach
    • 2nd Grade >
      • Snowmen at Night
      • Drawing of an Event
    • 3rd Grade >
      • Meaning in Art from Around the World
      • Apples: Drawing from Observation
      • Map of Michigan
    • 4th Grade >
      • Lighthouse
      • Community Tradition/Events/Causes Pendant
  • Media/Material
    • Pencils
    • Watercolor Paint
    • Chalk Pastel
    • Tempera Paint
    • Oil Pastel
    • Crayons
    • Markers
    • Digital Art
    • Fiber Art
  • Art Around the World
    • North America
    • South America
    • Europe
    • Africa
    • Asia
    • Australia
  • Art History
    • Modern Art Timeline
  • About
  • Contact

Finding Meaning in Art from Around the World

  • I can describe the message that is being shown in a work of art.
  • I can describe how different cultures use art to record history and stories.
  • I can create a work of art using a technique or style similar to one of the cultures that I studied.
Day 1: Japanese Gyotaku

Today, you are going to begin by learning about an ancient Japanese art of fish printing.  You will view two videos about fish printing.  The first one will talk about the history of Gyotaku and how it has changed over time.  The second video is a demonstration of a person today creating a fish print.  While you watch the two videos, think about how this form of art is used to record a story or a history.  What is the story or history that is being told?  Do fish prints today have the same meaning as they did when they were first created? 
Now that you know a little bit about the process of creating gyotaku, check out some examples of actual prints!  While you are looking at the prints, pay attention to the details that the artist added to make a more interesting image. View examples of gyotaku here.

Time to check your understanding!  Answer these questions about gyotaku.

After you have finished answering the questions, bring your iPad up to Mrs. Andrews and show her that you have finished.  She will give you a piece of paper with a basic print of a fish.  Your job is to become the artist and embellish (add details) to the print to make it more interesting.  When you are finished, show your final design to another student and explain what details you added and why.  Do you think that you would have been paid for your interesting fish designs?

Day 2: Navajo Sand Paintings

Picture
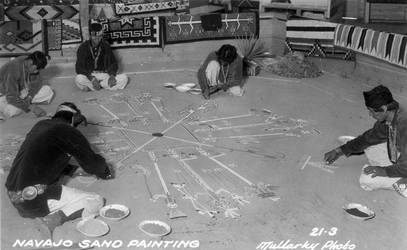
Navajo sand paintings first began as a way to help heal the sick.  Symbols were used to represent different things to help in the healing process.  The picture on the left shows five men working on a sand painting.  Although they are called sand paintings, they used many dry materials found in nature to create the pictures.  Items like crushed flowers, charcoal and crushed sandstone were used to created the different colors.  All of the designs were created by hand and took many hours to create.  After the ceremony was complete, the sand paintings were blown away.  Today, Navajo people create sand drawings on boards to sell, but they are created for decoration instead of for healing.

Photo used under Creative Commons License from Denver Library, photo by Mullarky Photo.
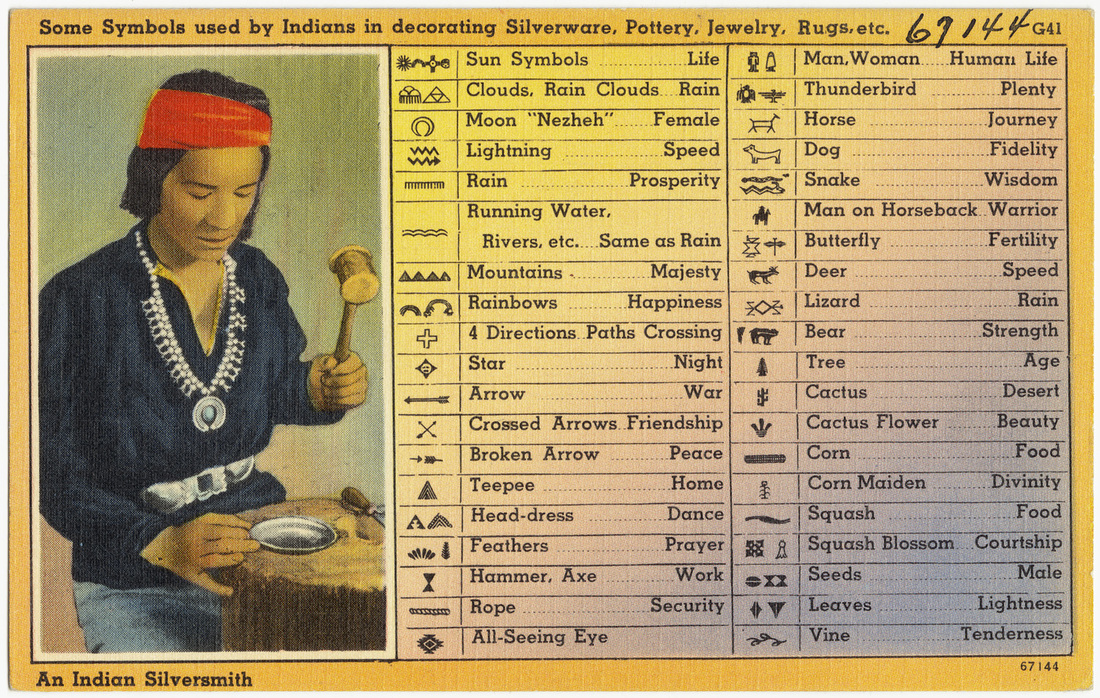
Begin today by studying the chart of symbols found below.  Notice how the symbol represents a specific meaning.  Select three of the symbols below and describe how the meaning and the symbol go together (you can write your answers down or discuss them with a classmate).  For example, I might say that the symbol of the horse goes with it's meaning, journey, because horses used to be what you would ride if you were going to go someplace far away.  What would be a symbol that we could use to represent a journey today?
After you have written about or discussed three of the symbols and their meanings, move on to the next step below.
Picture
Photo used under Creative Commons License from Boston Public Library.
Native Americans were the first people to live in North America.  There are many different tribes throughout North America, each with it's own history.  Different tribes have different symbols that they use and different symbols that are a part of their tradition.  Today, you will learn how to draw a couple different symbols and you will learn the meaning of those symbols.  Begin by selecting one of the videos below to watch and follow along with.  While you are drawing the symbol think about possible reasons that the symbol means what it does.  How do the symbols represent the meanings?  Can you think of any symbols that we have in our culture today that would represent something similar?
Now that you have looked at some symbols and their meanings and drew a traditional Native American design, it is time for you to create a design of your own.  Look back at the traditional Native American symbols and designs.  What do you notice is the same about all of them?  Do they use similar colors, patterns or shapes?  What inspired the designs?
Your job is to create a symbol that has a specific meaning, using the same style as the traditional Native American designs.  You will determine what the symbol is, how to draw it and what it will represent. 
  • Get a piece of paper and create your design. 
  • Under your design, write what the design is called.
  • Under the name of your design, write what it represents.
  • Turn your paper over and write your name and class code on the back.
  • On the back of your paper, use complete sentences to describe how your design is similar to and different from the style of a traditional Native American design.

Day 3: Adinkra Cloth

Today, you are going to learn about Adinkra cloths.  The Adinkra cloth is a cloth that was traditionally used for funerals.  The symbols on the cloths represent something about the character or personality of the person that has passed away.  As you watch the videos, think about the amount of time and effort that goes into making an Adinkra cloth.  Why do you think they spend so much time creating them?  What traditions do we have to honor the memory of a loved one that has passed away?
Remember, you can pause the video to read the words if you have trouble understanding what is being said.  Also, pay attention to the tools and parts they are showing to help you understand the process.
After watching the videos, think about the tools and processes used.  What did you notice?  Have you ever created an artwork using a similar process?
Now it is time to think about the symbols and what they represent.  Select one of the videos below and learn how to draw a traditional Adinkra symbol.  While you are drawing, think about how the process would be different if you were carving the design instead of drawing it with pencil.  What symbol would you use to represent yourself?  What symbols would you use to represent a loved one that has passed away?
How to Draw the Symbol of Royalty
How to Draw the Symbol of Strength
How to Draw the Symbol of Forgiveness
Now that you have some experience drawing some Adinkra symbols, create a symbol of your own and write it's meaning underneath it.  Remember, the Adinkra symbols represent something about a person's character or personality.  Create a symbol that represents something about you or a loved one.
  • Get a new piece of paper and draw your own symbol.
  • Under your symbol, write what it represents.
  • Write your name and class code on the back of your papers.
  • On the back of your paper, describe what an Adinkra cloth is and why it is made.  Make sure you mention what the symbols represent.

Day 4 & 5: Final Project

Today, you are going to reflect on what you have learned about Gyotaku, Navajo sand paintings and Adinkra cloths.  If you need a refresher on any of these, you can go back and watch the videos or look at some of the pictures to help you think about the different purposes and processes for each type of artwork.
Think about why each type of art is created.  Think about the process used to create each type of art.  After you have thought about these different techniques and styles of art, I want you to choose one that you would like to investigate further.  Whichever one you choose, will be the style for your final project.  Once you have decided which type of artwork you would like to try, select the video below that talks about that art form.  The video will walk you through the process you will need to create your artwork.

How to: Gyotaku

This video demonstrates how to create a Gyotaku print using the supplies we have at school.  While watching the video, think about how this process is the same and different from the original process.  Also, note the different ways that I use the materials to see if you can figure out some ideas about how you want to create your prints.
This video shows you how to finish your print by adding details.  While you watch the video, think about what details you want to add to your own fish.  How do details enhance the print?

How to: Navajo Sand Painting

This video demonstrates how to draw your design to prepare your board for creating a sand painting.
This video shows how to use glue and sand to create your final sand painting.  Imagine how creating a sand painting with glue is different from how they were originally created.  How would you feel if you spent hours creating a sand painting and then it was blown away in the wind?

How to: Adinkra Cloth

This video demonstrates how to create the lines that divide the sections of the Adinkra cloth.  You should do this before you carve your design so that your cloth has time to dry before you print the symbol.
This video shows how to carve your design into a potato and print your design.  While you are creating your design, think about what it represents about the person you are creating the Adinkra cloth about.  Do not create the same design as me, create a design that is about the person you have chosen.

When you complete your final project, upload it to Artsonia under the project called, "3rd - Finding Meaning in Art Around the World".  Make sure to give your project a title and answer the questions for your artist's statement before you submit the project.

Powered by Create your own unique website with customizable templates.
  • Projects
    • Kindergarten >
      • Primary Birds
      • Roots
      • Story of Our 5 Senses
      • Jungle/Rainforest
      • Insects
    • 1st Grade >
      • Fish with Patterns
      • Windy Day at the Beach
    • 2nd Grade >
      • Snowmen at Night
      • Drawing of an Event
    • 3rd Grade >
      • Meaning in Art from Around the World
      • Apples: Drawing from Observation
      • Map of Michigan
    • 4th Grade >
      • Lighthouse
      • Community Tradition/Events/Causes Pendant
  • Media/Material
    • Pencils
    • Watercolor Paint
    • Chalk Pastel
    • Tempera Paint
    • Oil Pastel
    • Crayons
    • Markers
    • Digital Art
    • Fiber Art
  • Art Around the World
    • North America
    • South America
    • Europe
    • Africa
    • Asia
    • Australia
  • Art History
    • Modern Art Timeline
  • About
  • Contact